
Colab Notebooks:
Audiocraft Infinity WebUI by 1aienthusiast
MusicGen+ WebUI by ClownOfMadness
MusicGen WebUI Demo
MusicGen WebUI by Coffee Vampir3
Hey everyone! Today, we've got an exciting topic lined up for you: automatically generating music with the help of AI. We'll be exploring Meta's open-source project called MusicGen, which allows you to create music from text prompts using AI. Whether you're a content creator looking for background music, a curious tech enthusiast, or simply looking for a new creative outlet, this is a topic worth exploring. In this video, we'll cover everything you need to get started with MusicGen, including the setup process, running it on Google Colab or locally, testing its capabilities, and even incorporating melodies from existing audio files. So, let's jump in!
Requirements
If you want to get started quickly, Google Colab is the way to go. All you need is a Google account, but keep in mind that the free tier of Colab has its limits, so if you're feeling adventurous and want more flexibility, you might want to consider running MusicGen on your own computer. Don't worry if you don't have the latest graphics card; MusicGen offers four different models: Large, Melody, Medium, and Small. So, even if you don't have the latest card, you'll likely be able to run it successfully. According to the readme file, the Large model performs best on 16 GB cards or higher, but I've personally had success running it on my 10 GB RTX 3080. Generating a 30 second song took about 5 minutes. With the melody model it takes two minutes. The Audiocraft Infinity web user interface (WebUI) works on Linux, macOS, and Windows. I personally put it to the test on both Linux and Windows, and it worked like a charm. 
Google Colab setup
To run MusicGen on Google Colab, simply open the collab notebook. I recommend making a copy of the notebook in your Google Drive, so that you can freely create and save changes. Before running the script, make sure that the runtime is set to GPU. 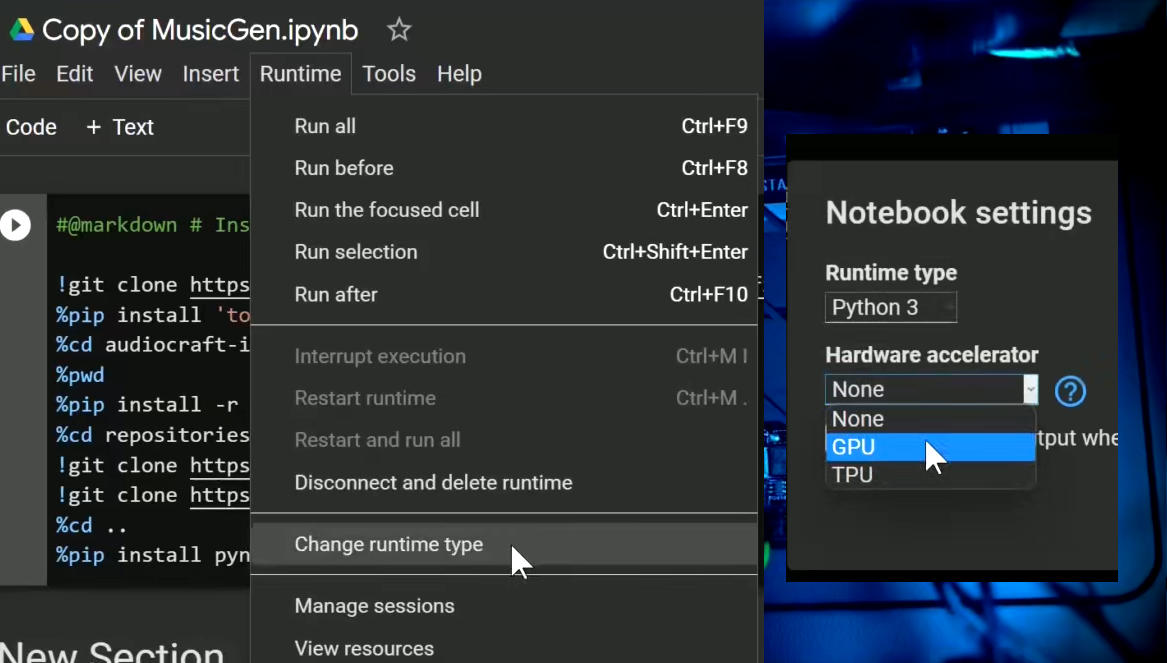
Next, click the 'Run' button next to the first script, which will download the necessary dependencies and install the WebUI. This process typically takes around a minute. During this time, you can prepare the optional ngrok token for the next step. Visit ngrok.com, create an account, and navigate to 'Your AuthToken' to copy the token. Then, paste the token into the 'ngrok token' field in the Colab notebook. Once the installation is complete, run the WebUI step by pressing the 'Run' button in the notebook. If everything goes smoothly, you'll see a message indicating that the WebUI is running on a local URL. Click on the ngrok link provided at the beginning of the output to access the WebUI interface.
Test run
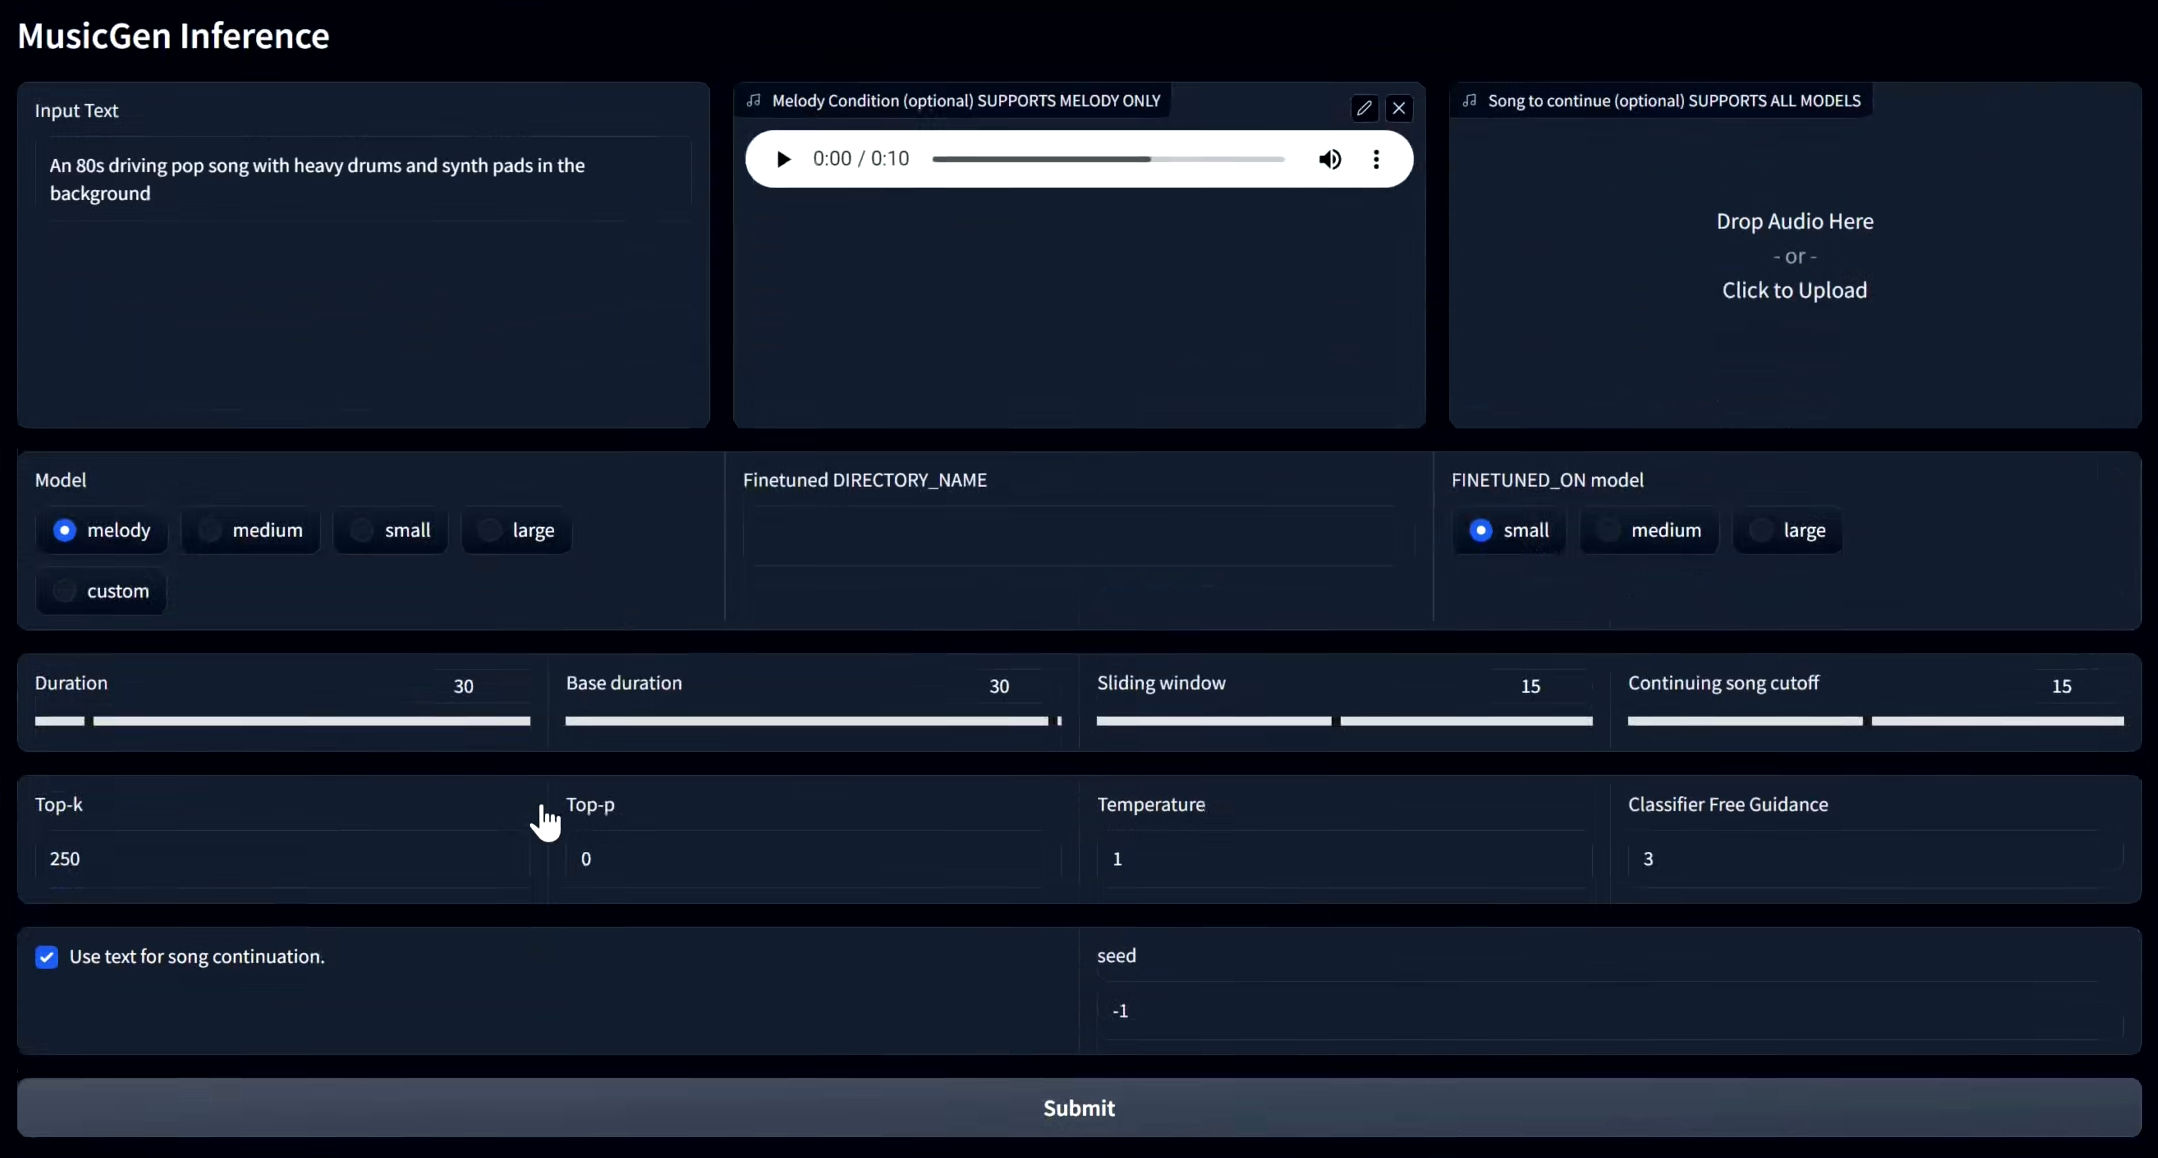
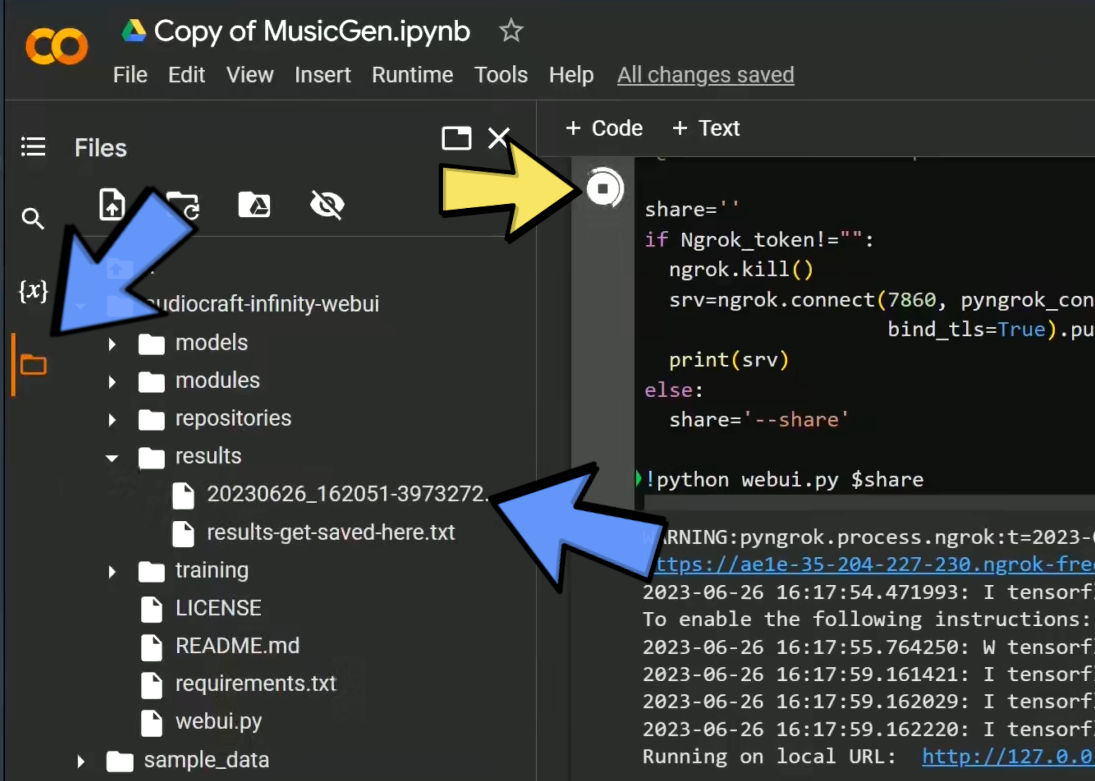
To check that MusicGen is functioning properly, let's perform a test run. Scroll down to the bottom of the WebUI page and select one of the examples. This will automatically populate the required fields. Now, hit the magic 'Submit' button to begin generating the song. If this is your first time running the app in the Colab runtime, you can monitor the model download progress in the Colab notebook output. During our test run, it took approximately 2 minutes to generate a song using the Melody model. Once the song is complete, it will appear in an audio player below the 'Submit' button. Depending on your browser, you can either select the 'Download' option from the three dots menu or right-click the player and choose 'Save audio as' to save the song. In case you didn't use ngrok to run the app, the player might not appear and the app will display an error instead. However, you can still find the output in the results folder within the notebook's file explorer and download it from there. If you encounter any errors after obtaining the initial results, try restarting the app from the notebook. Lastly, remember to stop the process when you’re finished working with the app. Even if it’s not generating anything, leaving the script running will consume your colab resources.
Other repositories
In addition to Audiocraft Infinity WebUI, there are a couple of other repositories worth mentioning. The original Audiocraft repository also offers a web UI. What sets it apart is the option to use microphone input for the melody, allowing you to record the input music from within the app. However, it lacks the window slider feature and I couldn't find the option to set a specific seed for generating the music. Another repository worth exploring is audiocraft_plus. This implementation adds the useful feature of having different prompts for various parts of the output song. For example, you can start with a sad but hopeful section, transition into a majestic and epic segment, and maybe end on a calm note. While I'm not a composer, this feature seems ideal for generating longer music pieces. You can find the links to both repositories in the links below. Just like Audiocraft Infinity, these projects can be run on Google Colab or locally.
Github links to the projects:
Audiocraft WebUI by CoffeeVampir3
Audiocraft (Original)
Audiocraft Plus by ClownOfMadness, installation guide
Github link to the notebooks:
https://github.com/wandaweb/musicgen-webui-google-colab
Running locally
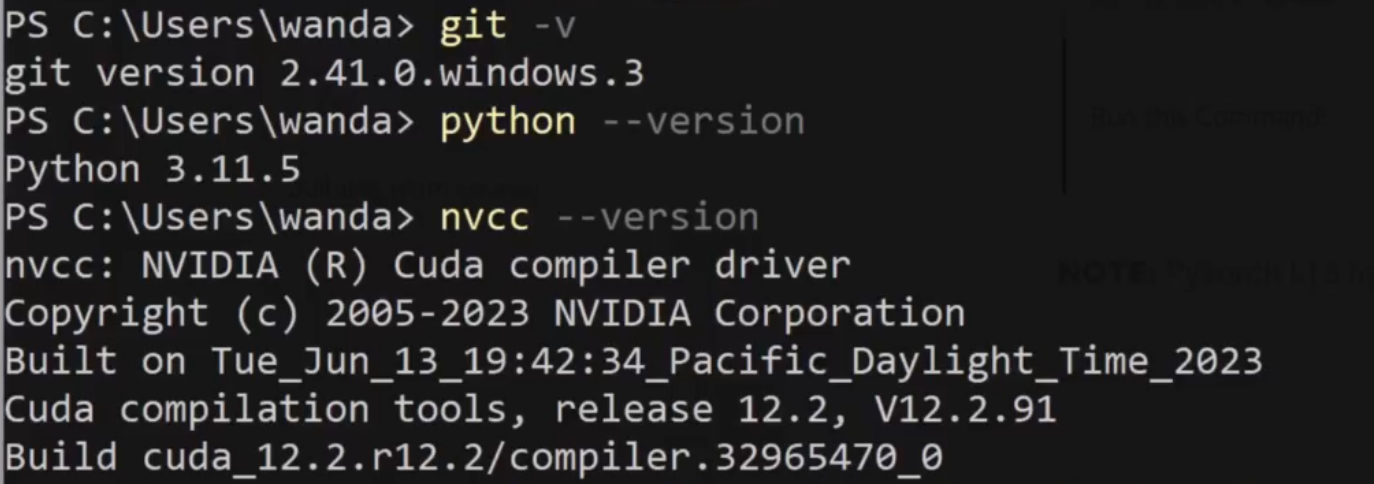
Speaking of running locally… Let's get MusicGen running on a Windows system, and Linux users, don't worry, the process is pretty much the same for you too! So, first things first, we need to grab nVidia's CUDA Toolkit. Just follow that link, choose the right version, download it, and run the installer. Next, we need to install Python, which can be found in the Windows Store or on the Python web site. It helps to also have git installed, even though we can manage without it. To check Python is all set, open up PowerShell or the command prompt and type 'py --version' (if you use a python launcher) or 'python --version' to see your installed Python version. While in the command prompt, you can also test if CUDA is installed by typing 'nvcc -v'. Likewise, ‘git -v’ will show you the git version if it’s installed. Once these prerequisites are in place, let's navigate to the folder where we want to install MusicGen.
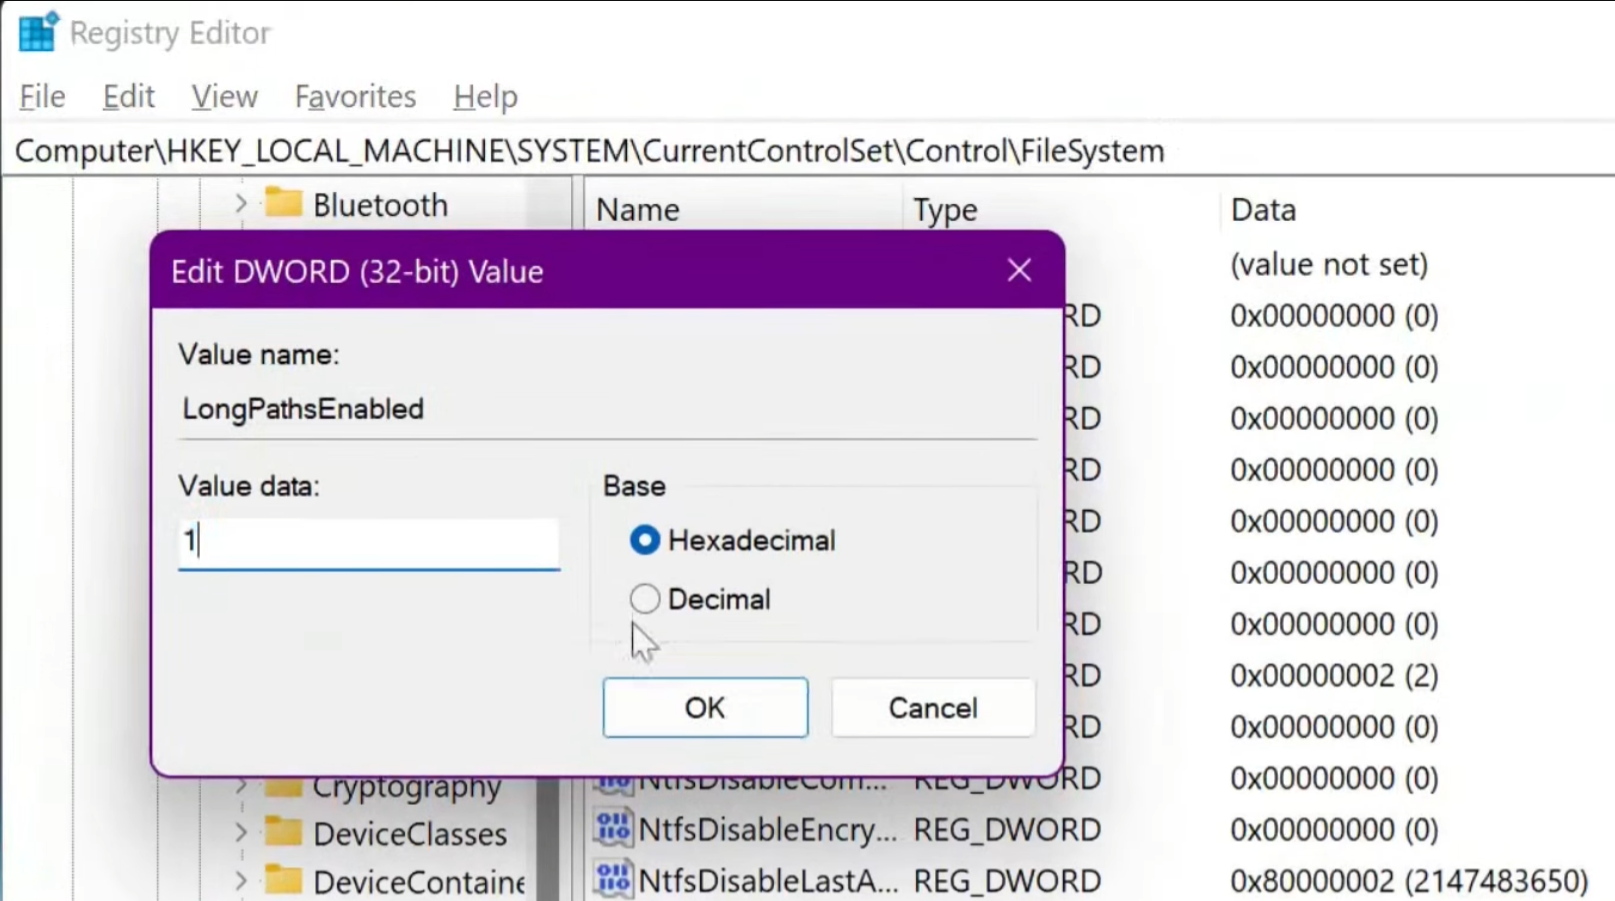
You can grab the code from the GitHub repository either by using the 'git' command or by downloading and extracting the ZIP file from the project's page. Next, we need to install PyTorch. You can find the correct installation command for your setup on the official PyTorch website. It’s a good idea to select the CUDA version you have, although it will probably work with an older one. Copy the generated command and run it in Powershell, making sure to use the Python package installer you have on your system. If you get an error about a missing file, make sure long paths are enabled on Windows. This can be done in the registry.
Once PyTorch is installed, you can use the 'requirements.txt' file to install the remaining packages. Once that’s done, navigate to the 'repositories' folder and download two more repositories: 'audiocraft' and 'musicgen trainer'. You can do this with the 'git' command or by manually downloading them from GitHub. If you choose to download and extract manually, make sure that the folder names match the project names.
pip3 install torch torchvision torchaudio --index-url https://download.pytorch.org/whl/cu117
git clone https://github.com/wandaweb/audiocraft-infinity-webui/
cd audiocraft-infinity-webui
pip install -r requirements.txt
cd repositories
git clone --branch v0.0.2 https://github.com/facebookresearch/audiocraft
git clone https://github.com/chavinlo/musicgen_trainer
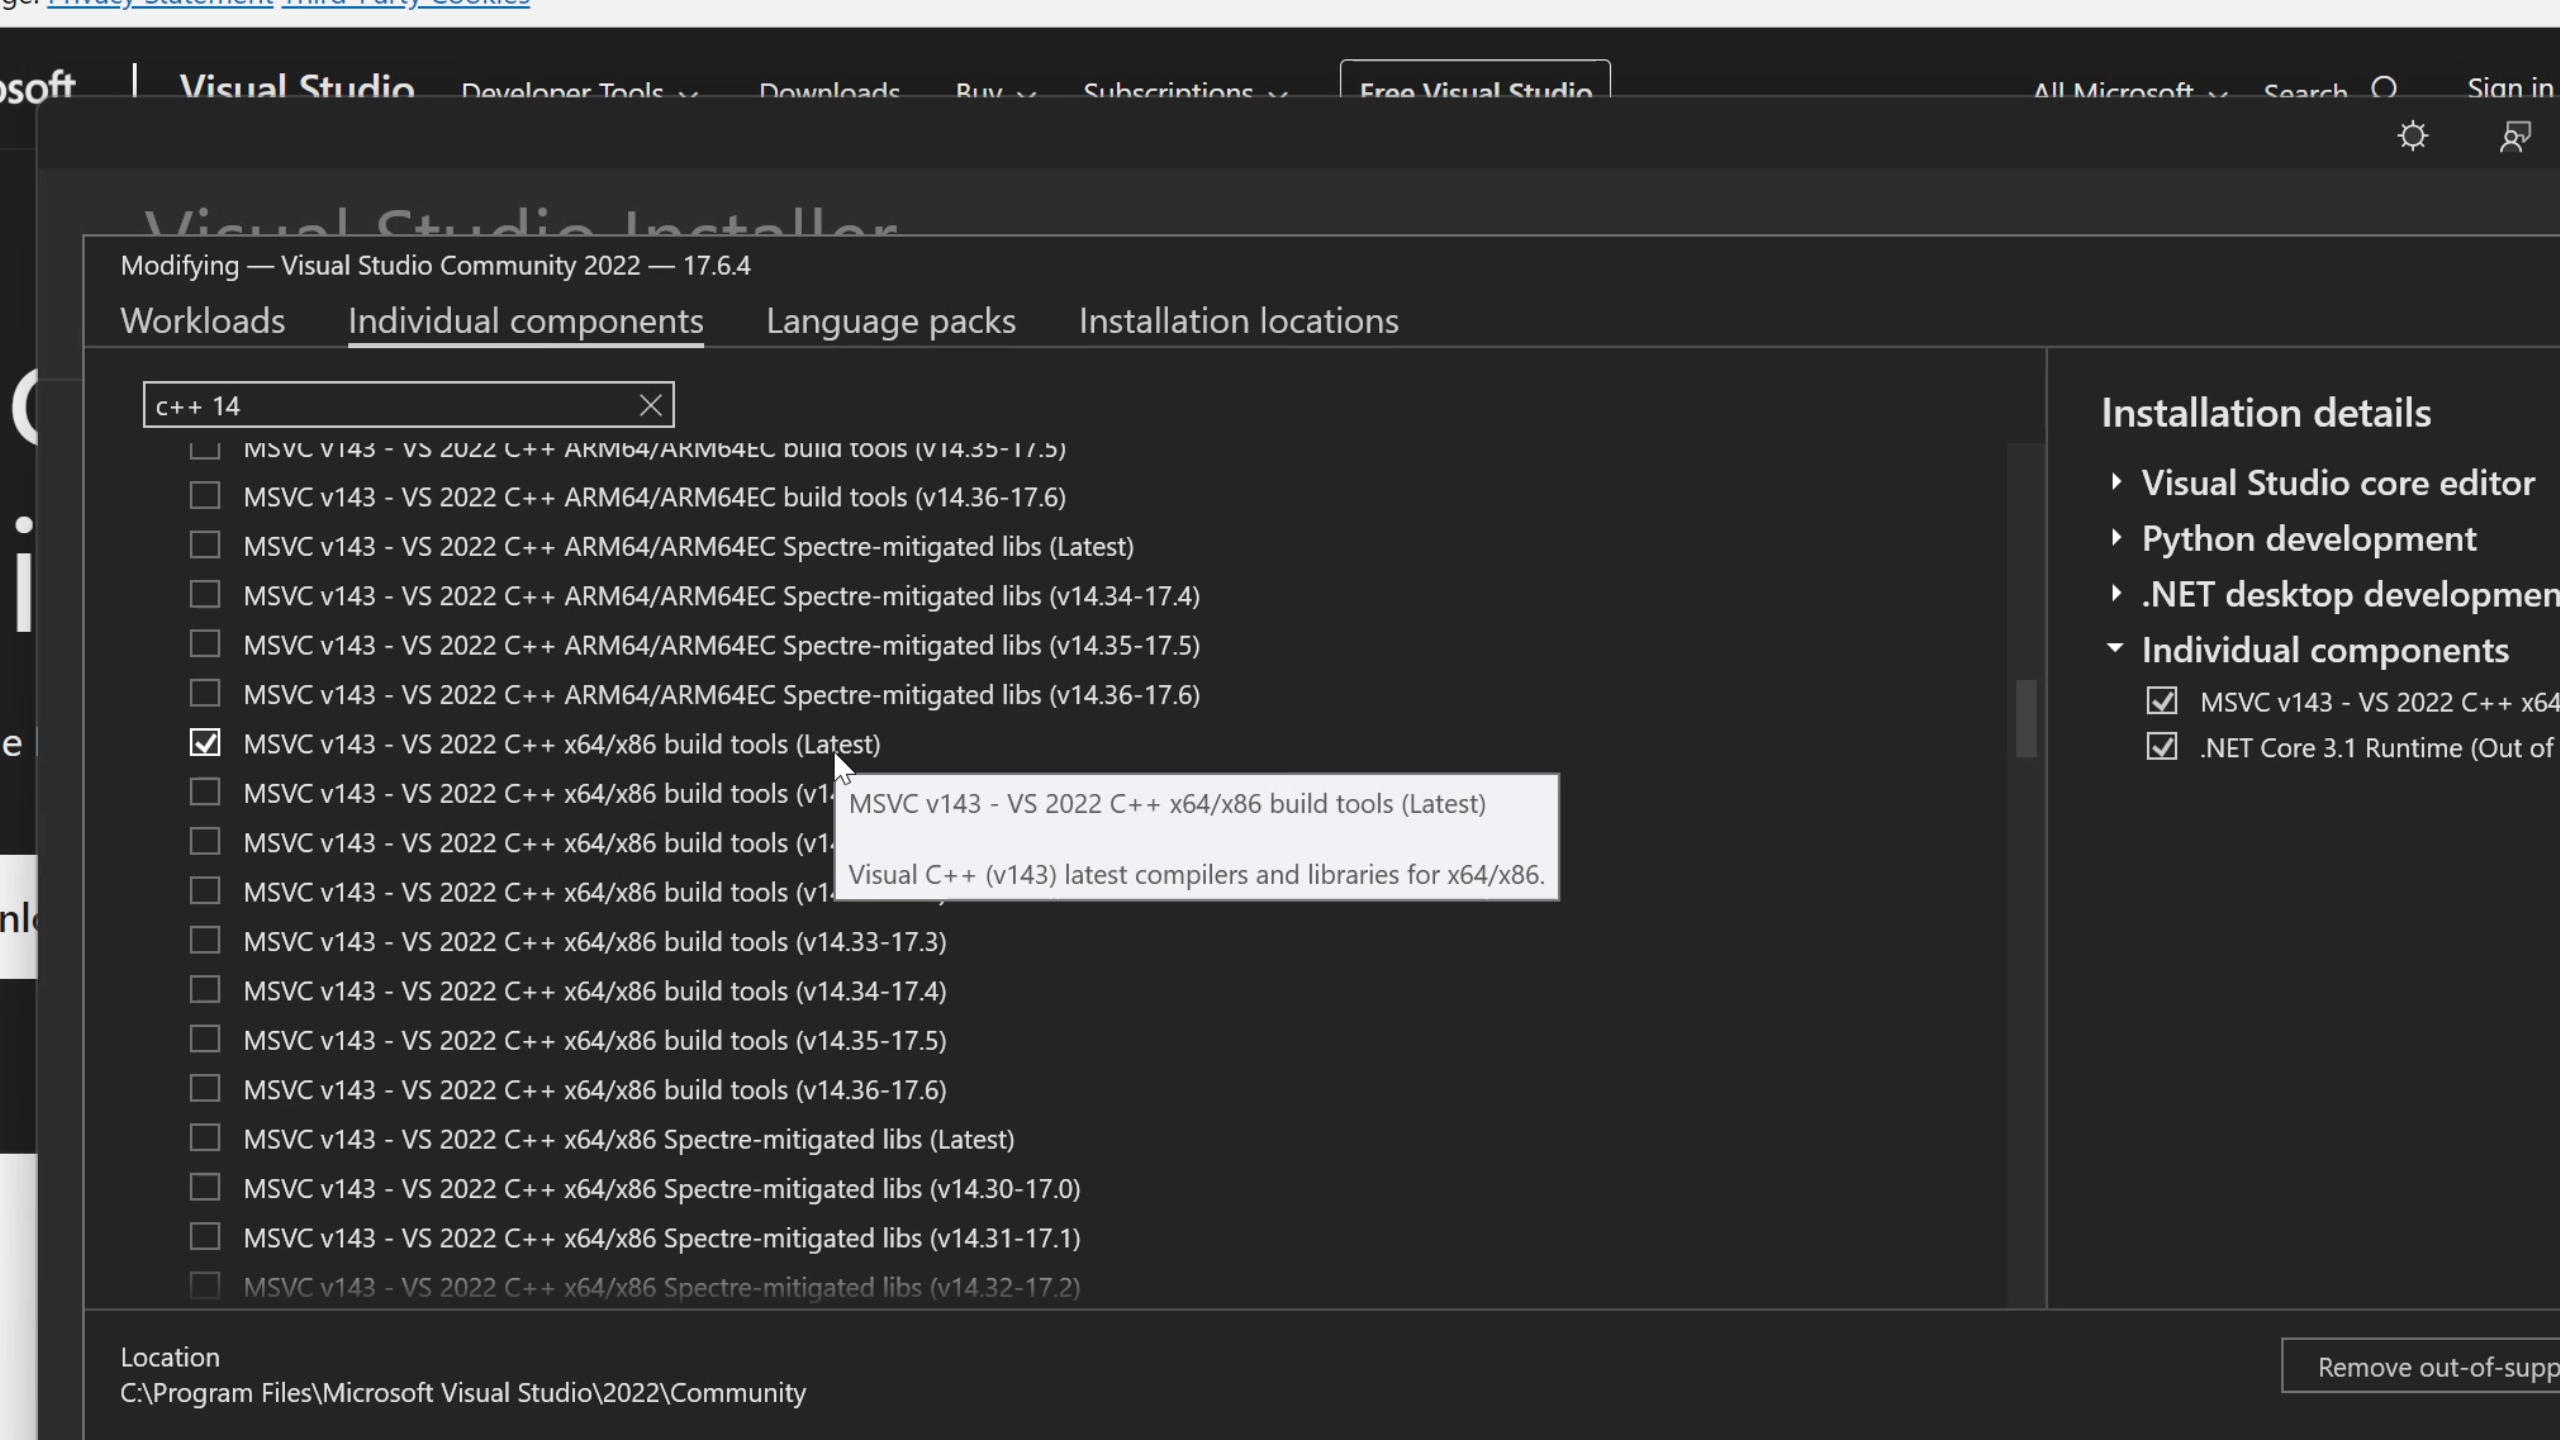
cd ..If a c++ compiler is missing, download Microsoft C++ Build Tools and install MSVC C++ x64/86 build tools
Finally, we can use Python to run the WebUI.
python webui.pyExecute the python command to start the WebUI, and it’s ready to go! You can access the website using the provided link in the output. The examples located at the bottom of the page are a great way to test the app's functionality. If you encounter any memory-related issues, try using one of the smaller models to lighten the load on your system.
Prompts
Now, let's get to the exciting part: prompts! This is where the real fun begins. We can use descriptive words to guide the music generation process. The official examples often mix emotions and genres, resulting in prompts like 'happy rock,' 'energetic EDM,' or 'sad jazz.' Sounds easy enough, right? Some tutorials suggest incorporating additional information such as time signatures, beats per minute (BPM), and audio quality. For instance, you might come across prompts like '4/4, 120 BPM, 320kbps, 48kHz happy powerful EDM with beautiful synths and chords.' Here, '4/4' represents the time signature, '120 BPM' denotes the beats per minute (with dance songs typically around 120), and '320kbps, 48kHz' ensures good audio quality. It's worth mentioning that while these elements are mentioned, we're still exploring their precise impact on the output through ongoing tests.
To find inspiration for prompts, you can explore online resources such as the musicgen-prompts list. This platform allows users to share prompts that produce good results, complete with audio samples and the corresponding parameters used for generating the output. Additionally, you can refer to prompts mentioned in the research paper that compares MusicGen with other music generation models. These resources can provide valuable insights and spark creativity when crafting your own prompts.
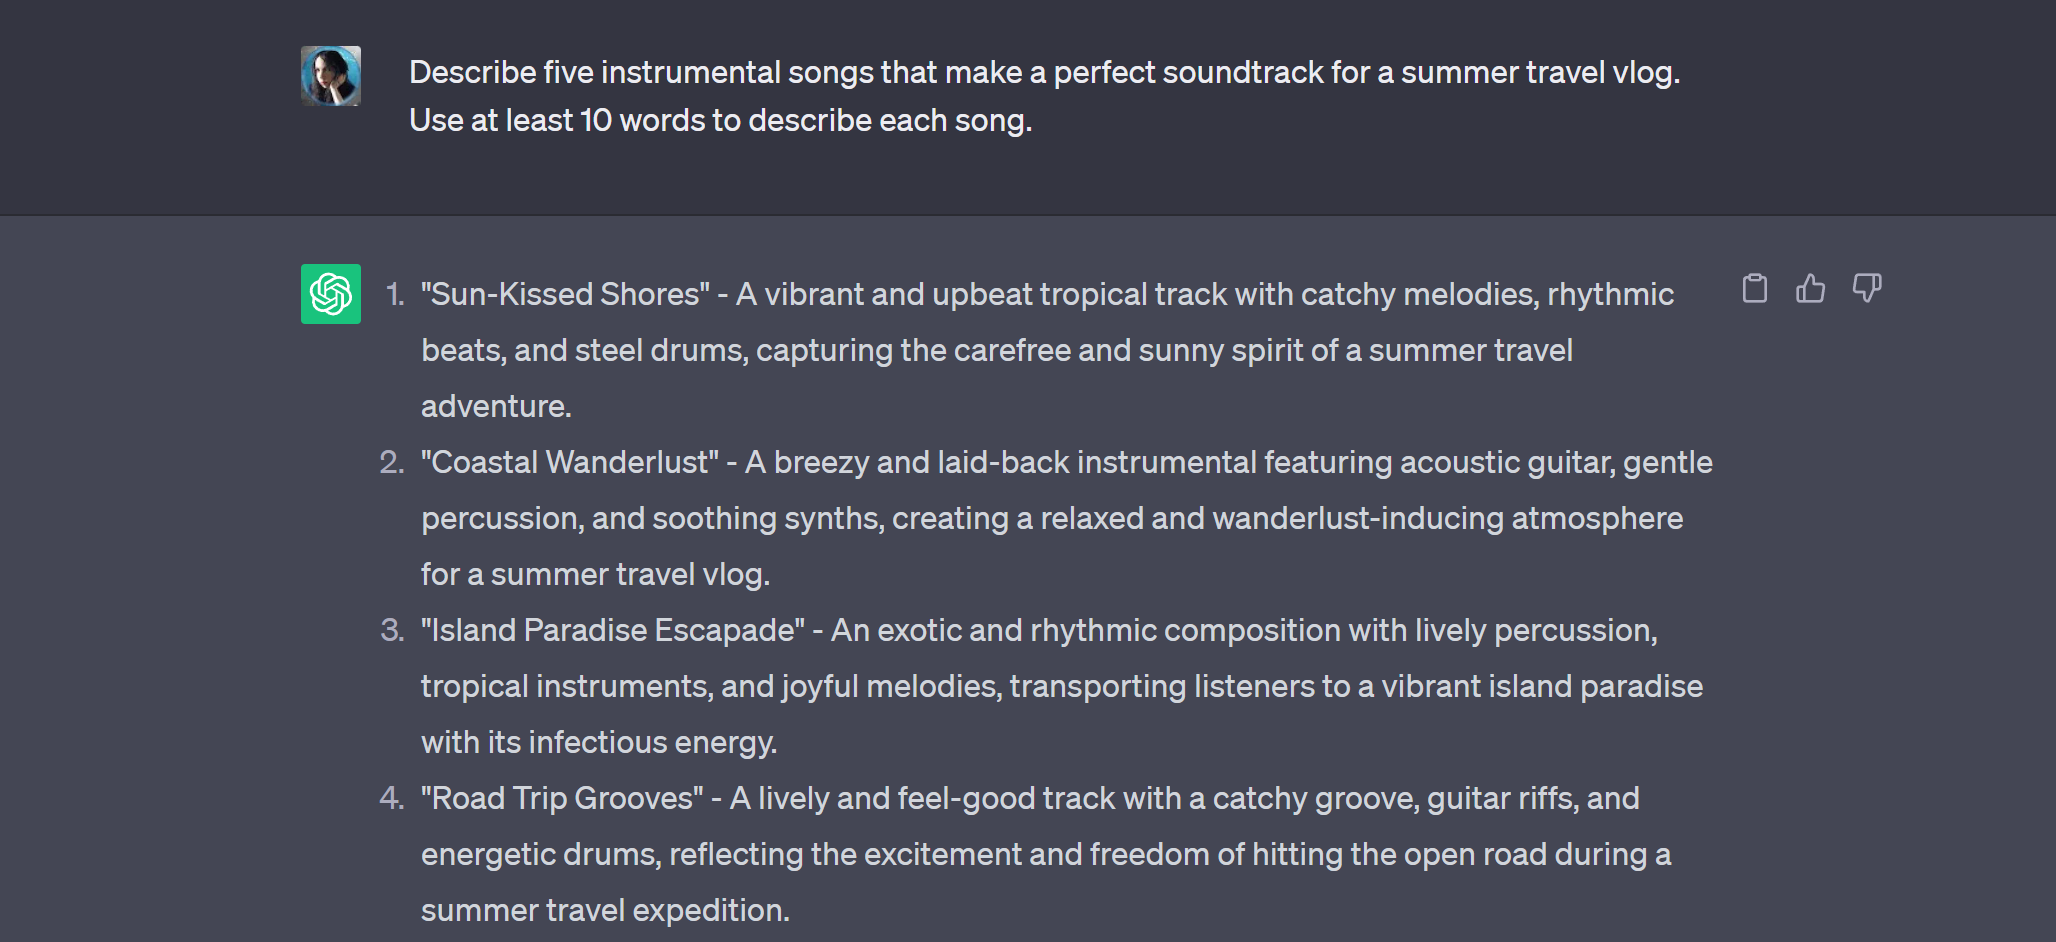
Another great way to find prompt text is by utilizing ChatGPT or a similar tool. Simply let it know what you need the music for, and ask it to generate descriptions. Most of them make excellent prompts.
For example: Describe 5 instrumental songs that would make a good soundtrack for an epic fantasy video game set in medieval times. Use at least 10 words to describe each song.
Melody
One of the cool features offered by Audiocraft is the ability to guide song generation using an audio file. If you’re running locally, you'll need to install FFmpeg to use mp3 files as melodies. Luckily, it's easy to download and you just need to make sure the exe files are in your Path variable. The installation instructions can be found here. Once FFmpeg is installed, we can tap into the power of existing melodies to influence the music generated by MusicGen. This opens up a world of possibilities for incorporating melodies from your favorite songs or any inspiring audio file. It can be a lot of fun to explore how popular songs can be transformed into different genres or played with different instruments. However, to avoid any copyright concerns on my YouTube channel, I decided to use a melody from Pixabay Music. If you come across a longer song, tools like Audacity can help you to snip out the most interesting part for your project.
But wait, there’s more! If you wish to extend the generated song, you can drag and drop the generated file into the "song to continue" field and continue the musical journey, building upon the previous composition.
The possibilities are endless, and you can get truly creative with melody, genre and mood transformations.
Parameters
Parameters allow us to fine-tune the audio generation process to make it closer to the desired sound. Or, if used exactly the wrong way, they can create an output that sounds like a cat got hold of a violin and tried to summon Cthulhu. When it comes to MusicGen, here's what we currently know.
Top-k and top-p: During the generation process, the algorithm needs to select how to continue the song at each step. For example, if it’s currently playing a deep bass tone, it might continue in the same style, or it might switch to a higher pitch, or fade into silence. There are many options, and these parameters determine the selection process for the most likely tokens at each generation step. In top K sampling, the next piece that’s added to the generated output will be selected from the k most likely ones. Top-k sampling involves sorting tokens by probability and choosing from the top k items. On the other hand, top p sampling adds the top tokens until their sum of probabilities exceeds the threshold p. It makes sense to use either one of them, but not both at the same time. These parameters influence the output's variability and the algorithm's confidence in its top choices. If the value is low, the generated song might get stuck in a short loop, on a single tone or in white noise, while a higher value will introduce more diversity.
Temperature: Similar to physics, temperature affects randomness. Higher temperature values promote diversity and creativity but may also introduce unexpected sounds or changes. Conversely, temperature below 1 will reduce variety.
Window slider: The window slider comes into play when generating longer songs. Since the model generates music in 30-second chunks, the window slider enables the generation of longer sequences by using multiple 30-second windows. For example, if the slide window is set to 10 seconds, the remaining 20 seconds generated in the previous window serve as context. Therefore, if the desired output is one minute long, it will take 6 steps with the window slider set to 10 seconds. Alternatively, if the window slider is set to 20 seconds, leaving 10 seconds as context, it will take 3 steps to generate a one-minute song.
Classifier free guidance: This parameter refers to the classifier trained on labeled data to recognize specific musical characteristics or styles. A higher value brings the generated output closer to the input prompt in terms of desired characteristics or styles.
Seed: The seed allows for the generation of similar-sounding songs. Leaving the seed at -1 generates a new random seed each time. However, if you come across a seed on a prompt sharing web site, you can input that specific seed to replicate the output. Keep in mind that the model and other parameters also influence the final result, so even with the correct seed, the output might not match expectations precisely. Seed information can also be useful when generating 10-second clips quickly to identify a suitable seed for a longer song.
Understanding these parameters lets you control and adjust the generated music according to your preferences and creative vision.
I hope you found this article helpful and that you’re on your way to have some fun generating music. Have a very musical day!