
This guide shows how to share an Android phone screen in OBS.
Running the Scrcpy App
First, we need a program called scrcpy, which is available on Github. The app works on GNU/Linux, Windows and macOS.
- Linux: `apt install scrcpy`
- Windows: [download]
- macOS: `brew install scrcpy`
All download links can be found here: https://github.com/Genymobile/scrcpy/releases/
I've been successfully running it on Windows and Debian. I would just read the whole readme file because this app can do some really cool stuff.
https://github.com/Genymobile/scrcpy
It connects to the phone either by USB or WiFi. We'll use the USB option first. Before it can work, we need to enable USB debugging on the phone, which is in Developer Options.
To activate those, on most phones,
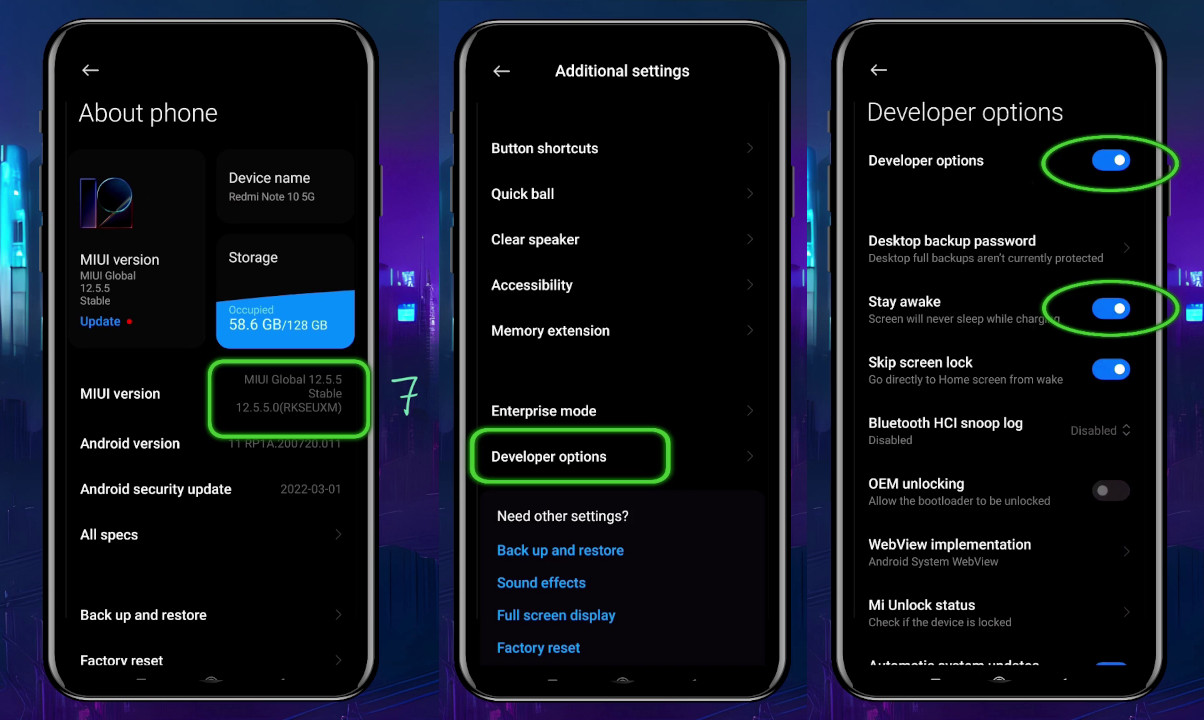
1. Go to Settings, then System.
2. Touch About phone.
3. Touch the Build number field 7 times. You will begin seeing a message as you approach the 7 touches.
4. Touch the back arrow once complete, and Developer options will now appear under Advanced Settings.
If these are not the right steps for your model, you can check the link below, or look in your phone's manual.
The following page shows how to enable developer options and turn on USB debugging for various models.
https://developer.android.com/studio/debug/dev-options#enable
Afer enabling USB Debugging in developer options, I also turn on the option Stay Awake so the phone screen doesn't turn off after a while. On some phones there's one more way to keep the screen on, even when not plugged in, and it's to set
Settings -> Lock Screen -> Sleep -> Never
Now that the phone is ready, let's connect it to the PC with a USB cable.
I use my old phone without a SIM card for this because I don't want anyone calling while I'm on stream, but I guess Airplane mode should work too.
The quickest way to test scrcpy is working is to just launch the executable, scrcpy.exe. When connected, a prompt should pop up asking to enable USB Debugging. Just tap OK.
Adjusting the Screen Size and Orientation
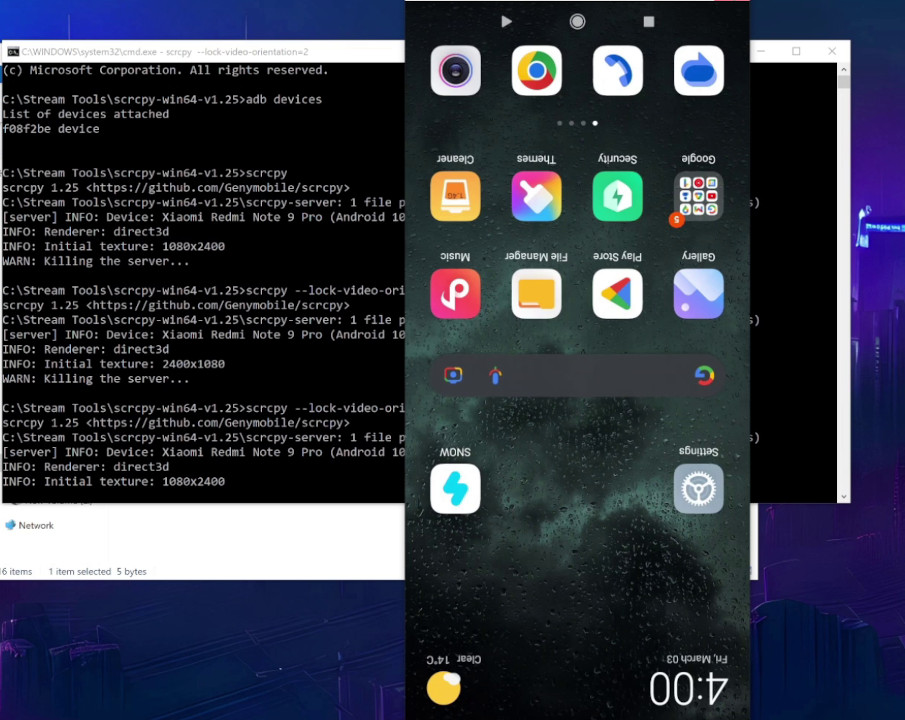
In the folder where you downloaded scrcpy, double click the file called "open_a_terminal_here.bat", or just navigate to the folder in a terminal. To check the device is connected, run the command "adb devices". The output should show the connected device. List of devices attached f08f2be device
Now we can start Screen Copy. scrcpy
This should already look pretty good, but we can tweak it further. The first issue that might arise is your phone's orientation. If you have it in landscape mode or upside-down, you'll need to use the video-orientation option to rotate it. Let's try that one: scrcpy --lock-video-orientation=1
One is for rotating counter clockwise, three is for clockwise, and two is for flipping the video.
I usually change the max size with m, bitrate with b, and set the max fps. I suggest playing around a bit to find the best values. If you get jitter, you can add the buffering option to reduce it, while adding some latency. This isn't really an issue, as you'll probably need to add a delay to the audio due to the phone's app having a little latency. scrcpy -m 1080 -b 8M --max-fps 60
Resizing the window will also resize the window source in OBS. The -m argument is useful for making sure the window is the same size every time the app starts.
Adding the Android Screen View to OBS
To add the phone screen as a window source in OBS, go to Scene -> Add -> Window Capture and select the scrcpy window. Automatic mode works for me, but if the image is frozen, try one of the other two. 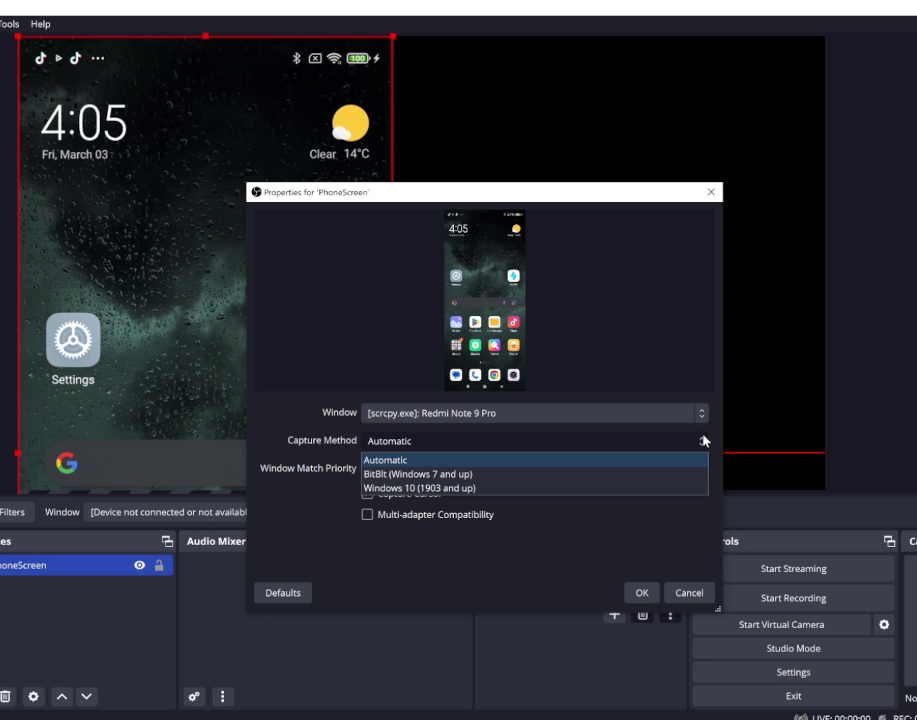
Showing an Arbitrary Part of the Screen
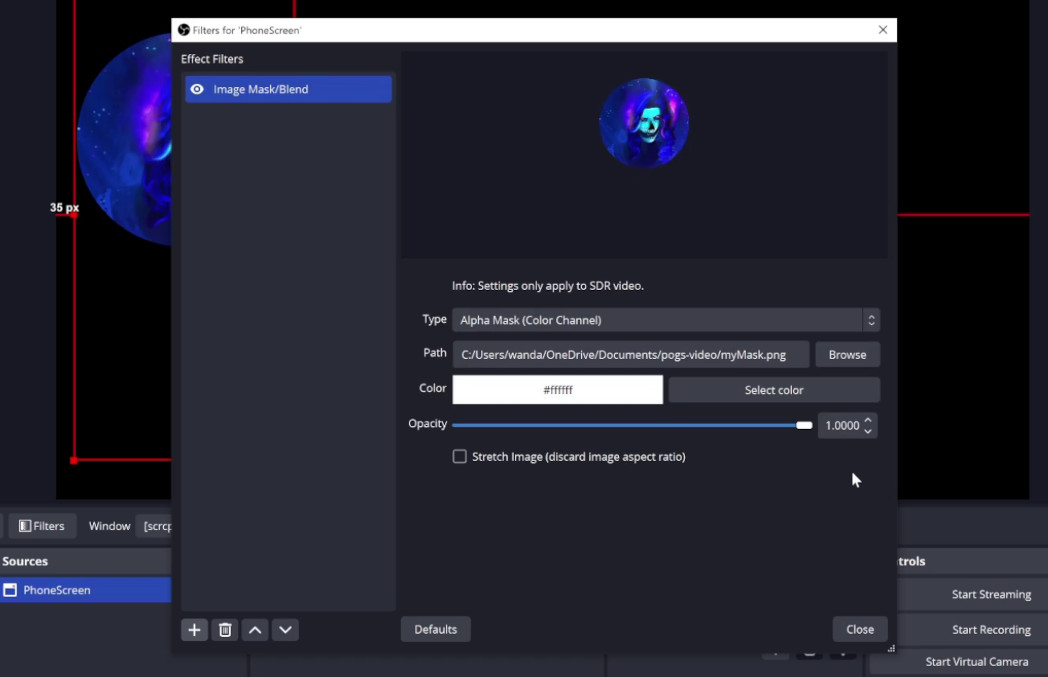
Now we can add a crop filter or a mask to select what we show. I like adding a mask by drawing over a screenshot. The way I'd get the screenshot on Windows is by putting the scrcpy window in focus and pressing Shift + Win + S, then from the top menu, select the option Window Snip. On Linux I'd use xfce4-screenshooter (but I'm sure you'll pick your favorite screenshot app), with the Region to capture set to Active Window. This will capture the whole window, which makes creating the mask easier.
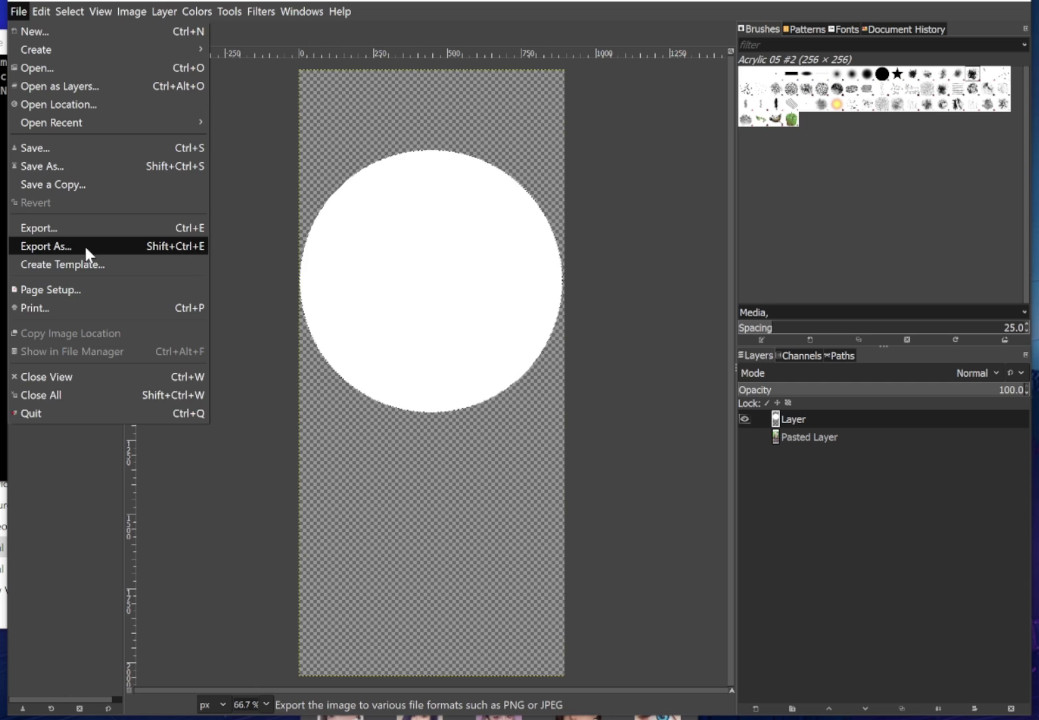
Next, we need a photo editing program. I use Gimp, which is free to download here. In Gimp, you can simply press Ctrl+V to paste the screenshot. Then I'll pres Ctrl+L to show layers, and Ctrl+Shift+N to add a new layer. Set "fill with" to transparent. Now you can get creative here with tools such as the brush to draw a cool shape, but I'll just take the Select tool, which can be a Rectangle or an Elipse, set it to elipse, and set the Fixed Aspect ration to 1 by 1, because I want a circle. Then position the circle around my face, select the Bucket tool, switch the main color to white, and spill it inside the circle. Now just hide the background in the Layers window and the mask is done. Export the file as a .png and it's ready to be imported into OBS.
Back in OBS, right click the Phone source, select Filters, and add an Image Mask. Choose the mask you just saved. And here's our new cute facecam!
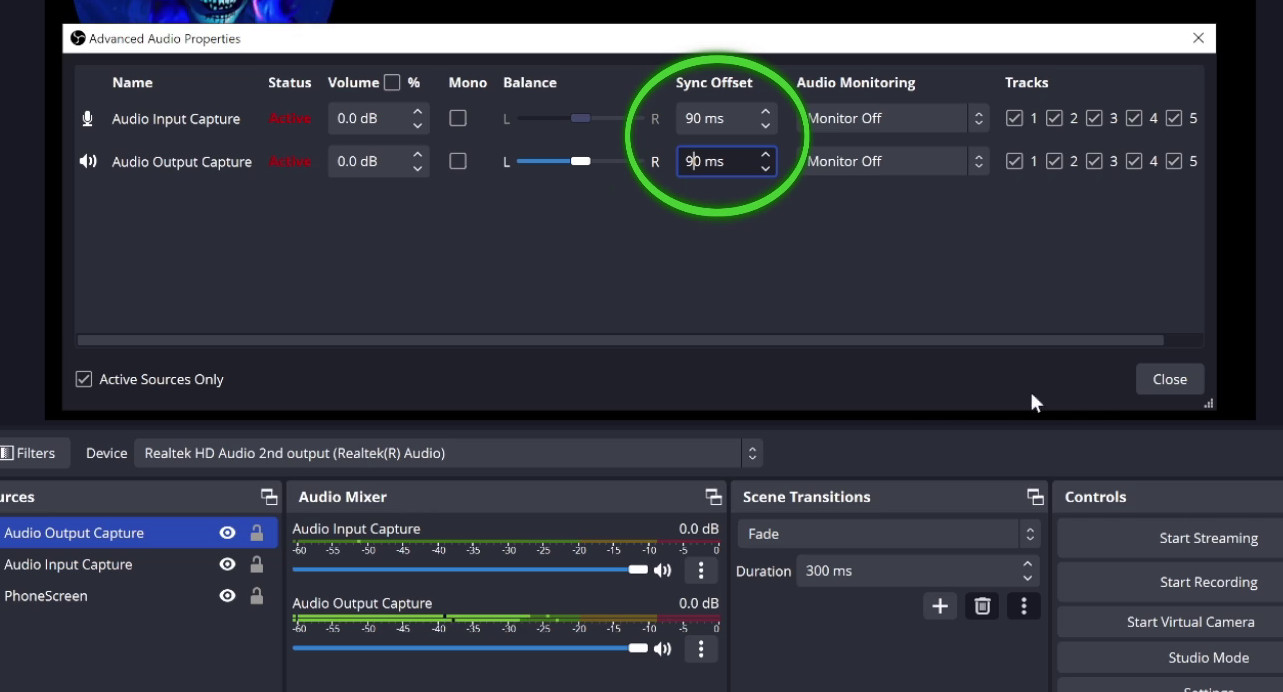
Audio Offset
We'll want to adjust the mic delay to the video delay on the phone. This depends on your phone's processing power. For me, an offset of 80ms usually does the trick. You can test this by recording a video of you clapping and then measuring the distance from the audio spike to the clap in a video editing program, or, you know, just guess until you get it right like I did. I would also offset my game audio and video sources by the same amount, but it's not really necessary for a good viewing experience.
Connecting with Wi-Fi
What about that Wi-Fi option? Maybe you want to share video from further away from your PC.
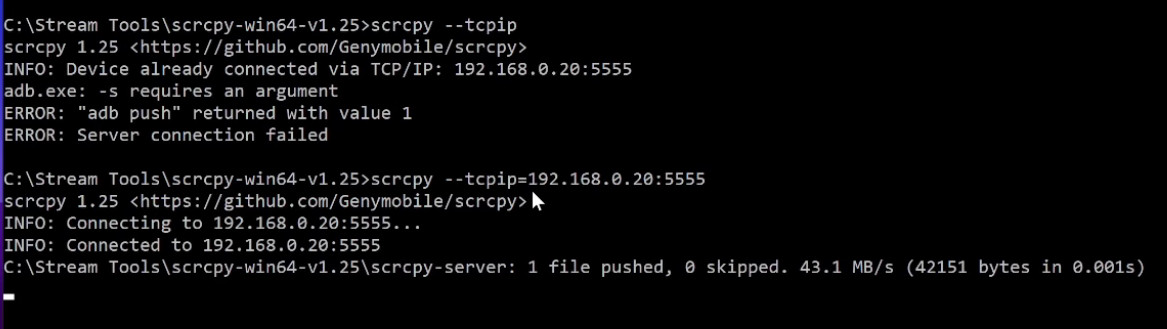
For this to work, the phone must be connected to the same WiFi network as the PC. While the phone is still connected via USB, let's run scrcpy --tcpip
This will show us the IP and port we need for the connection. Now we can close screen copy, unplug the USB cable and run scrcpy --tcpip followed by the address we just got, for example: scrcpy --tcpip=102.168.0.16:5555
Connecting this way could cause some more latency, but we can adjust the sound sources again in OBS to match.
Connecting Multiple Phones
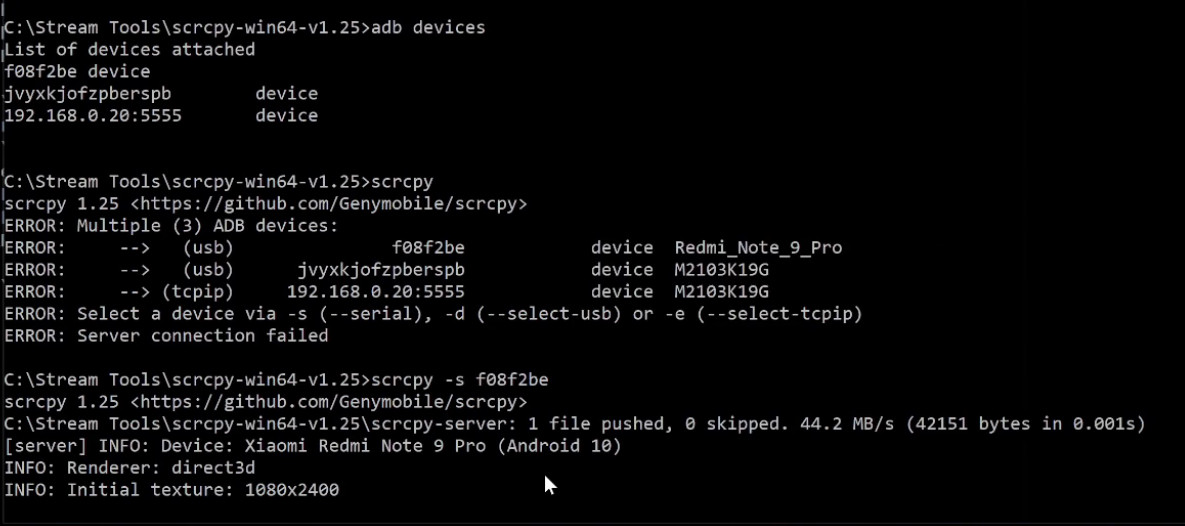
Maybe you'd like to share your second phone too, to have two cameras or show an app you're using. To share more than one phone screen, we need a way to differentiate them. Let's connect the second phone. Running scrcpy now will show us all phones connected, followed by an error about having multiple devices.
Since one is now connected by WiFi and one by USB, we can simply type scrcpy -d
to start the usb one and scrcpy -e
to start the WiFi one.
If both are connected the same way, we can run adb devices to get the serial numbers, or just look at the error scrcpy shows when run without arguments.
Then we can copy the device's serial and paste it after the --serial or -s flag: scrcpy -s (followed by the serial)
Let's start the terminal again and do the same for the second phone. And now we have both phones! They have different window titles, so they can be added in OBS as two separate window sources.
To avoid having to type these commands before every stream, I create desktop shortcuts to scrcpy, and add the parameters I use there. Right click scrcpy and select Create Shortcut. On Windows 11, this will be under "More Options". Then right click the shortcut and go to Properties. Here, in the Target field, we can add all the parameters we used, for example
-s 12335467 -m 1080 -b 5M --max-fps 30
I usually put these in a folder on my Desktop, along with other programs I sometimes run just before a stream.